
DIY Server Cabinet: 31 Steps?
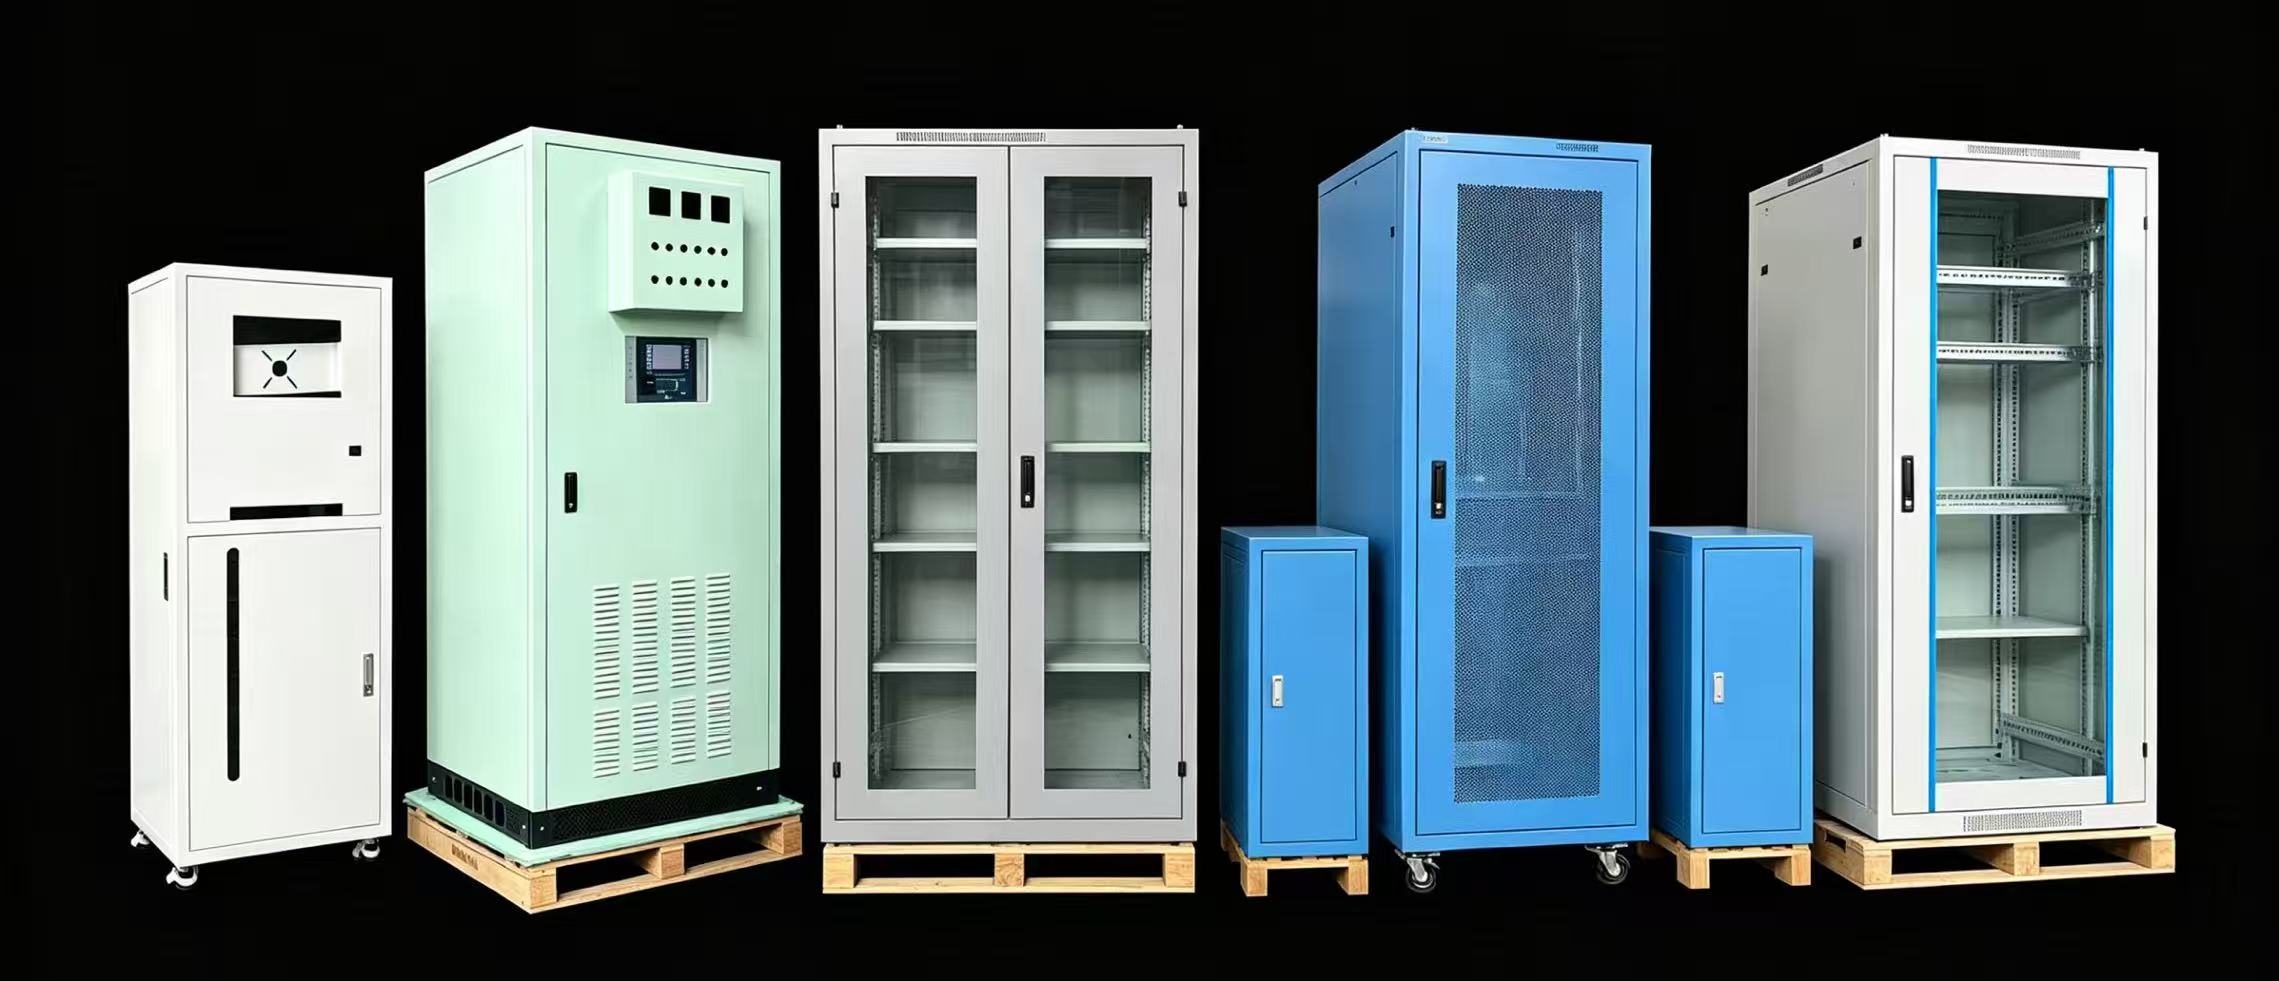
A bad DIY server cabinet can waste money, trap heat, and make cables unsafe. I learned that planning must come before cutting metal.
-
How Do I Plan The DIY Server Cabinet Before I Cut Any Steel?
Poor planning creates wrong U space, blocked airflow, and messy wiring. I prevent that problem by measuring every device before I design the cabinet.
I plan a DIY server cabinet by listing all equipment, measuring width, depth, height, checking heat output, checking cable direction, and choosing the cabinet U size and outer size based on the real installation space.
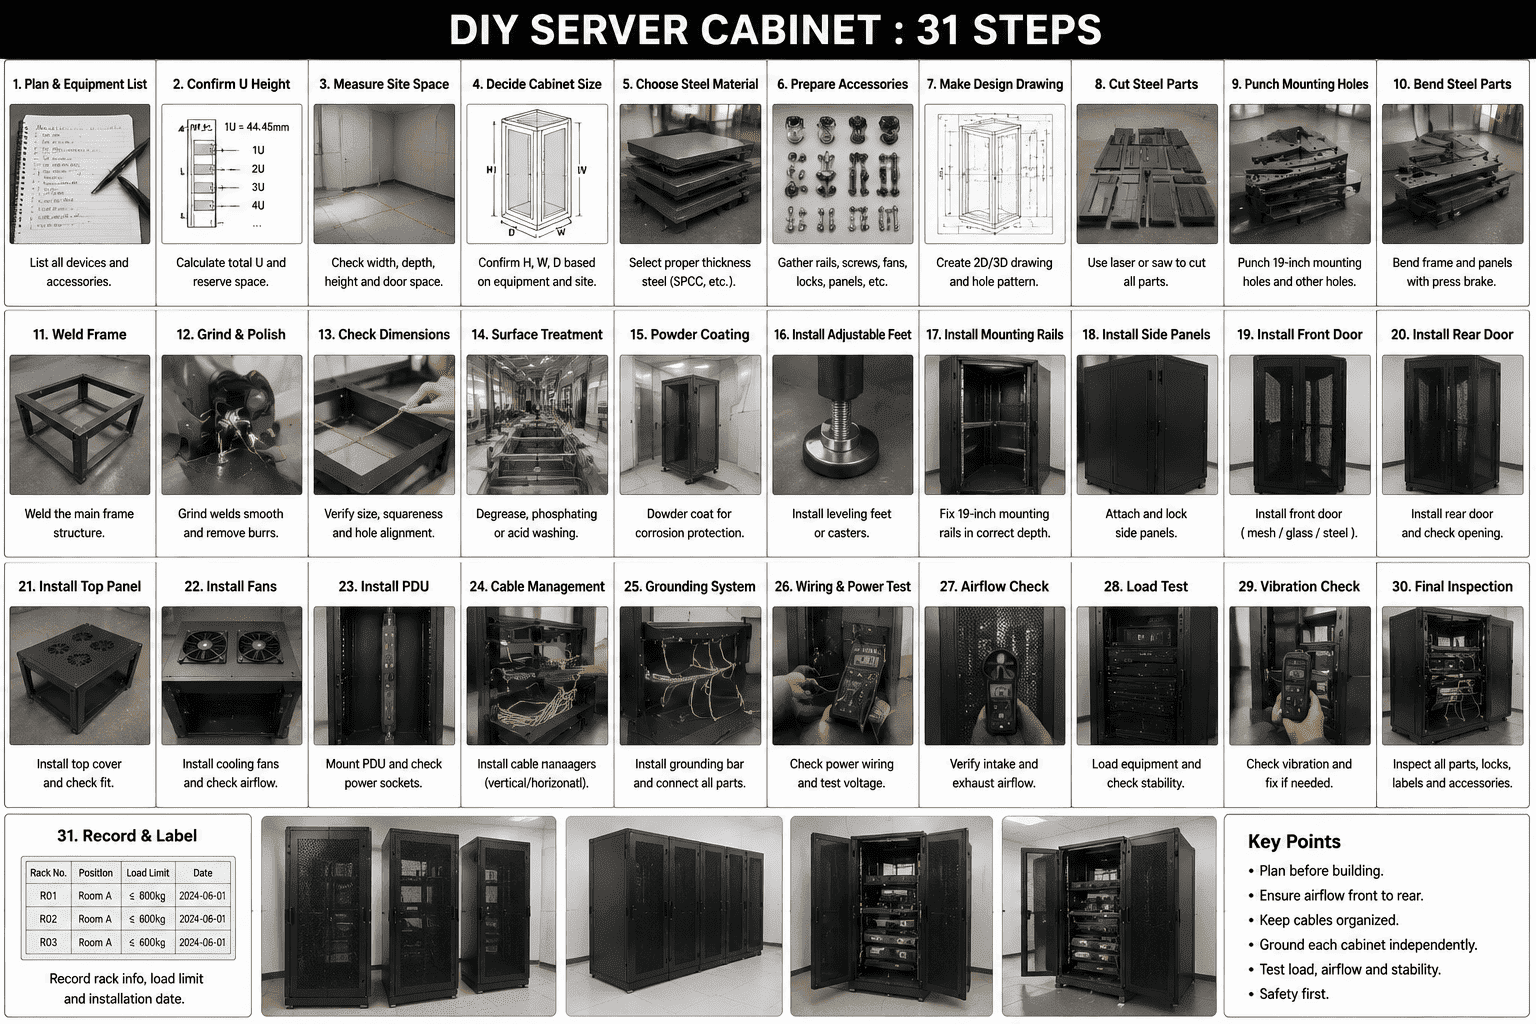
I always begin with planning because metal is not easy to “undo.” If I cut the wrong depth, the whole cabinet may become useless for deep servers or rear cable plugs. I write down the quantity, size, weight, and use of each device. I also leave space for future expansion. I do not fill every U position on day one. I normally leave at least 20% spare U space when the customer expects more devices later.1
| Step | What I Do | Why I Do It |
|---|---|---|
| 1 | I confirm the site space and equipment list. | I avoid a cabinet that cannot enter the room or fit the wall area. |
| 2 | I decide the U height, width, and depth. | I match servers, switches, UPS units, patch panels, and cable bend space. |
| 3 | I choose the material and thickness. | I balance cost, strength, weight, and load capacity. |
| 4 | I prepare the full tool list. | I avoid stopping during fabrication. |
| 5 | I prepare the full accessory list. | I make sure rails, fans, PDU, screws, and cable parts match the design. |
I prefer standard 19-inch rack spacing because most network and server equipment uses this structure2. I check if the cabinet needs 6U, 12U, 18U, 22U, 32U, 42U, or another size. I also check if the cabinet will stand on the floor, hang on a wall, or sit under a desk. I select cold-rolled steel when I need good flatness and clean bending. I may choose thicker steel for heavy UPS units or rack servers. I also decide if the front door needs mesh. Mesh doors help airflow. Solid doors reduce dust but need better fan design.3 I make these choices before I touch the cutting machine.
How Do I Turn The Plan Into A Real Cabinet Drawing?
A rough sketch is not enough for a server cabinet. I need hole spacing, bending lines, mounting positions, and tolerances before fabrication starts.
I turn the plan into a cabinet drawing by marking outer size, inner clear space, U positions, square hole rail location, panel sizes, ventilation holes, cable holes, hinge positions, locks, and bottom load points.
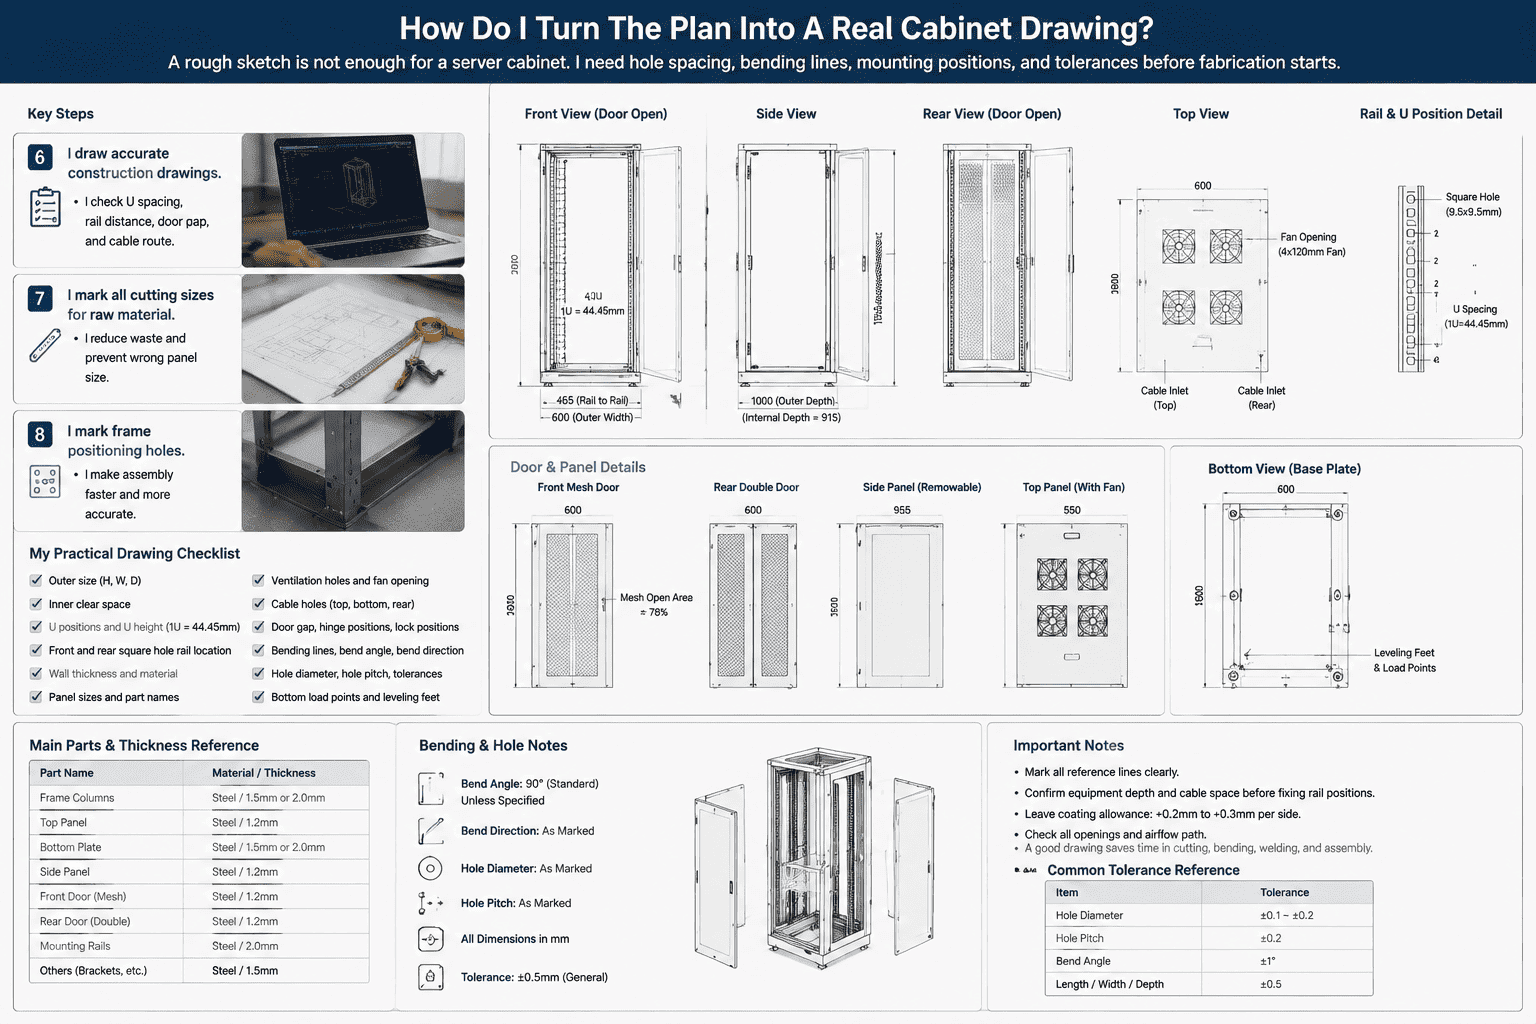
I use a clear drawing because the cabinet has many parts that must meet each other exactly. The frame, side panels, doors, rack rails, fan base, and bottom plate all depend on the same reference points. I normally set the front rack rail line first. Then I calculate the rear rail position by equipment depth and cable space. I also mark the bottom cable inlet and the top fan opening. This helps me avoid cutting holes after the cabinet is already assembled.
| Step | What I Draw | My Practical Check |
|---|---|---|
| 6 | I draw accurate construction drawings. | I check U spacing, rail distance, door gap, and cable route. |
| 7 | I mark all cutting sizes for raw material. | I reduce waste and prevent wrong panel size. |
| 8 | I mark frame positioning holes. | I make assembly faster and more accurate. |
I keep the drawing simple but complete. I do not rely on memory. I mark length, width, depth, hole diameter, hole pitch, bend direction, bend angle, and part name. I also write the material thickness beside each part. For example, I may use 1.2 mm steel for side panels, 1.5 mm or 2.0 mm steel for frame columns, and thicker support parts for the bottom. I also leave a small tolerance for powder coating because the coating adds thickness4. If the cabinet uses removable side panels, I mark the latch position and screw hole position. If the cabinet uses a customized mesh door, I mark mesh open area and frame strength. A good drawing saves time in cutting, bending, welding, and final assembly.
How Do I Fabricate And Assemble The Main Frame?
A weak frame makes the whole cabinet unsafe. I build the frame first because it carries the servers, UPS, rails, doors, and panels.
I fabricate the main frame by cutting the steel accurately, drilling positioning holes, trial fitting the frame, tightening or welding the structure, and adding bottom support parts before installing rack rails.
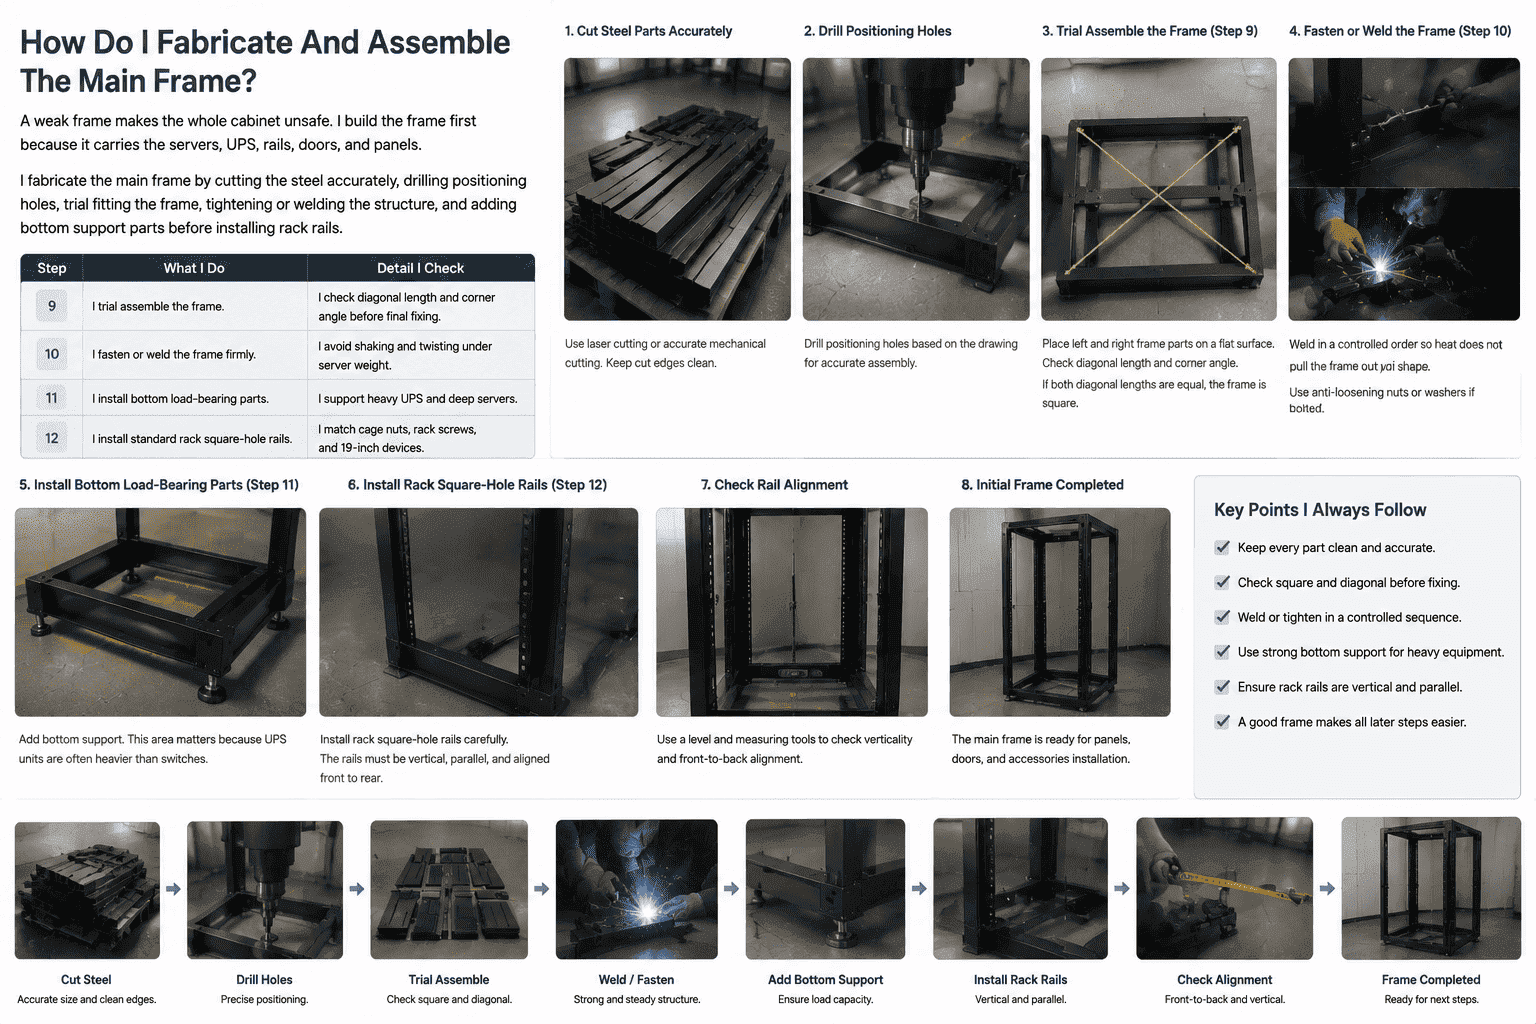
I treat the frame as the skeleton of the cabinet. If the frame is not square, every later step becomes harder. The door will not close well. The side panel will not fit. The rack rails may twist. I start with laser cutting or accurate mechanical cutting. I keep the cut edge clean because rough edges affect welding and assembly. After cutting, I drill the positioning holes based on the drawing.
| Step | What I Do | Detail I Check |
|---|---|---|
| 9 | I trial assemble the frame. | I check diagonal length and corner angle before final fixing. |
| 10 | I fasten or weld the frame firmly. | I avoid shaking and twisting under server weight. |
| 11 | I install bottom load-bearing parts. | I support heavy UPS and deep servers. |
| 12 | I install standard rack square-hole rails. | I match cage nuts, rack screws, and 19-inch devices. |
I like a trial assembly because it shows mistakes early. I place the left and right frame parts on a flat surface. I check the diagonal distance. If both diagonal lengths are equal, the frame is square.5 I use clamps before welding or tightening bolts. I do not rush this step. When I weld, I weld in a controlled order so heat does not pull the frame out of shape6. When I use bolts, I use anti-loosening nuts or washers. Then I add bottom support. This area matters because UPS units are often heavier than switches. I also install the rack square-hole rails carefully. The square-hole rails must be vertical, parallel, and aligned front to rear. If they are off by even a few millimeters, servers may be hard to mount.
How Do I Build The Panels, Doors, And Cooling Structure?
Heat and dust are serious problems in a cabinet. I design the panels and doors to guide air, not just to cover the frame.
I build cabinet panels and doors by processing side panels, cutting top ventilation holes, installing fan bases, making front and rear doors, then grinding, polishing, removing rust, and applying anti-rust treatment before coating or painting.
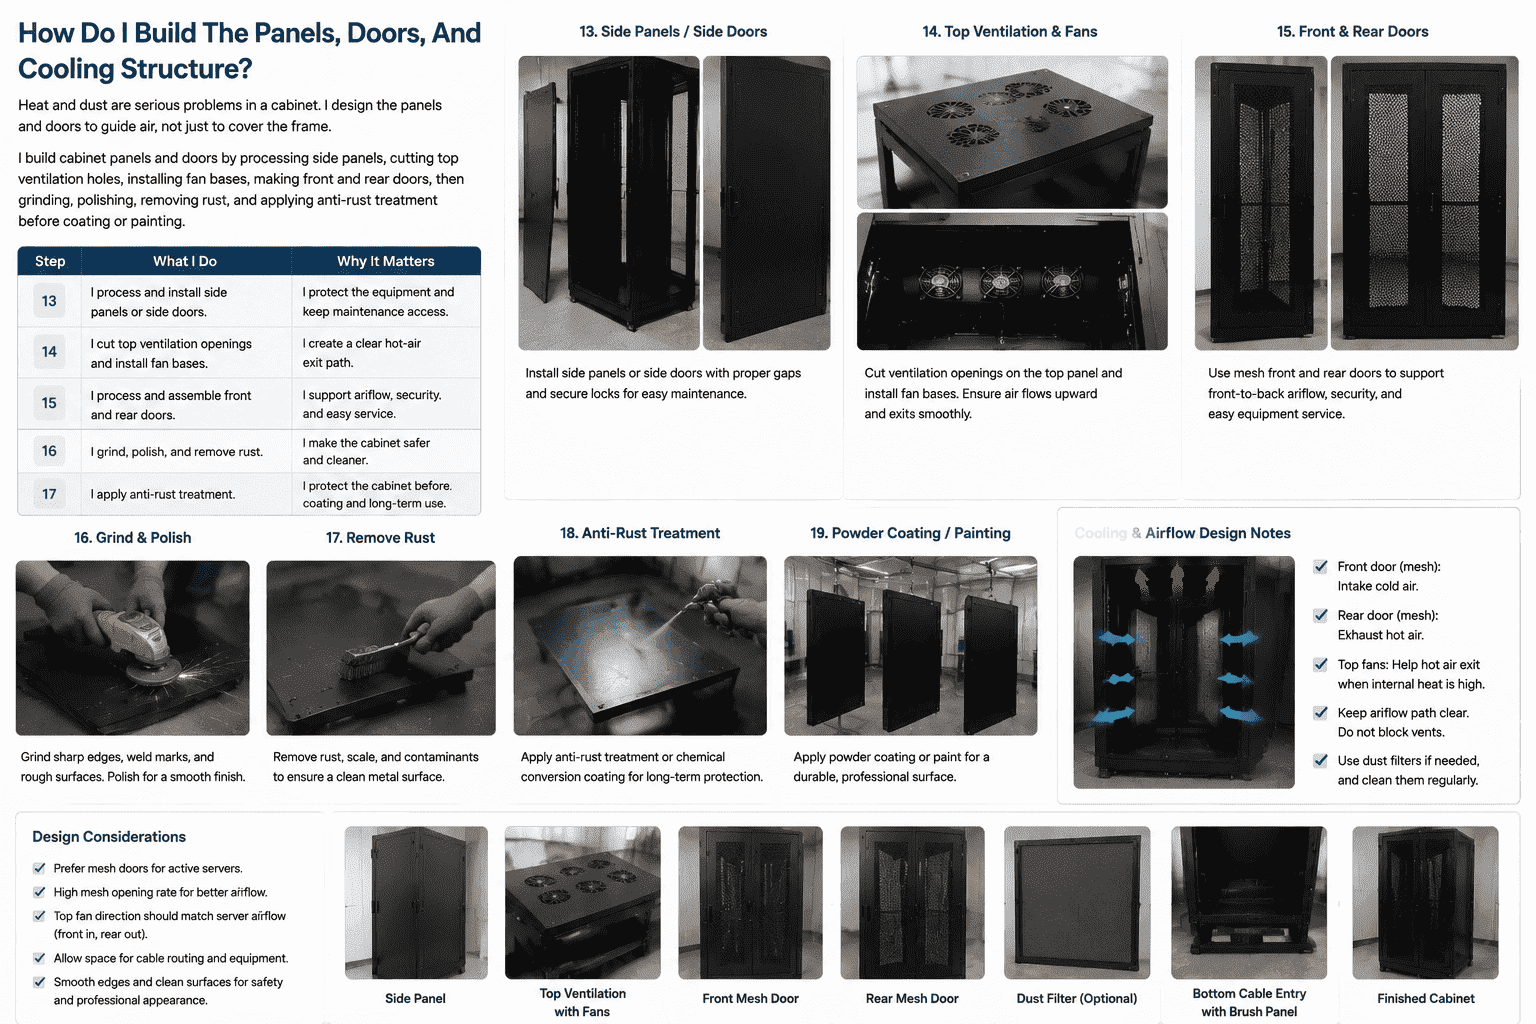
I work on panels after the main frame is stable. I do this because the real frame gives me a true size reference. Side panels need correct gaps. Doors need correct hinge lines. The top panel needs fan holes that do not hit the frame or cables. If I install cooling too late, I may discover that the fan base blocks equipment or cable routes.
| Step | What I Do | Why It Matters |
|---|---|---|
| 13 | I process and install side panels or side doors. | I protect the equipment and keep maintenance access. |
| 14 | I cut top ventilation openings and install fan bases. | I create a clear hot-air exit path. |
| 15 | I process and assemble front and rear doors. | I support airflow, security, and easy service. |
| 16 | I grind, polish, and remove rust. | I make the cabinet safer and cleaner. |
| 17 | I apply anti-rust treatment. | I protect the cabinet before coating and long-term use. |
I normally prefer a mesh front door and a mesh rear door when the cabinet holds active servers. The mesh opening rate should be high enough for airflow. If the room is dusty, I may add dust filters, but I also remember that filters reduce airflow and need cleaning. I add top fan openings when hot air needs help leaving the cabinet. I make sure fan direction is correct. I do not want fans fighting the server fans. Most servers pull cold air from the front and push hot air to the rear. The cabinet should support that path.7 After panel work, I grind sharp edges. I remove welding marks and rust spots. I also prepare the surface for powder coating or paint. A smooth, clean surface makes the cabinet look professional and prevents hand injuries during installation.
How Do I Calibrate The Cabinet And Install Inner Hardware?
A cabinet can look finished but still be wrong. I check level, rail alignment, screws, cable trays, fans, and cable holes before I mount equipment.
I calibrate the DIY server cabinet by standing it upright, checking level, installing cage nuts, vertical cable managers, top fans, bottom cable entries, PDU, horizontal cable managers, and patch panels in the correct positions.
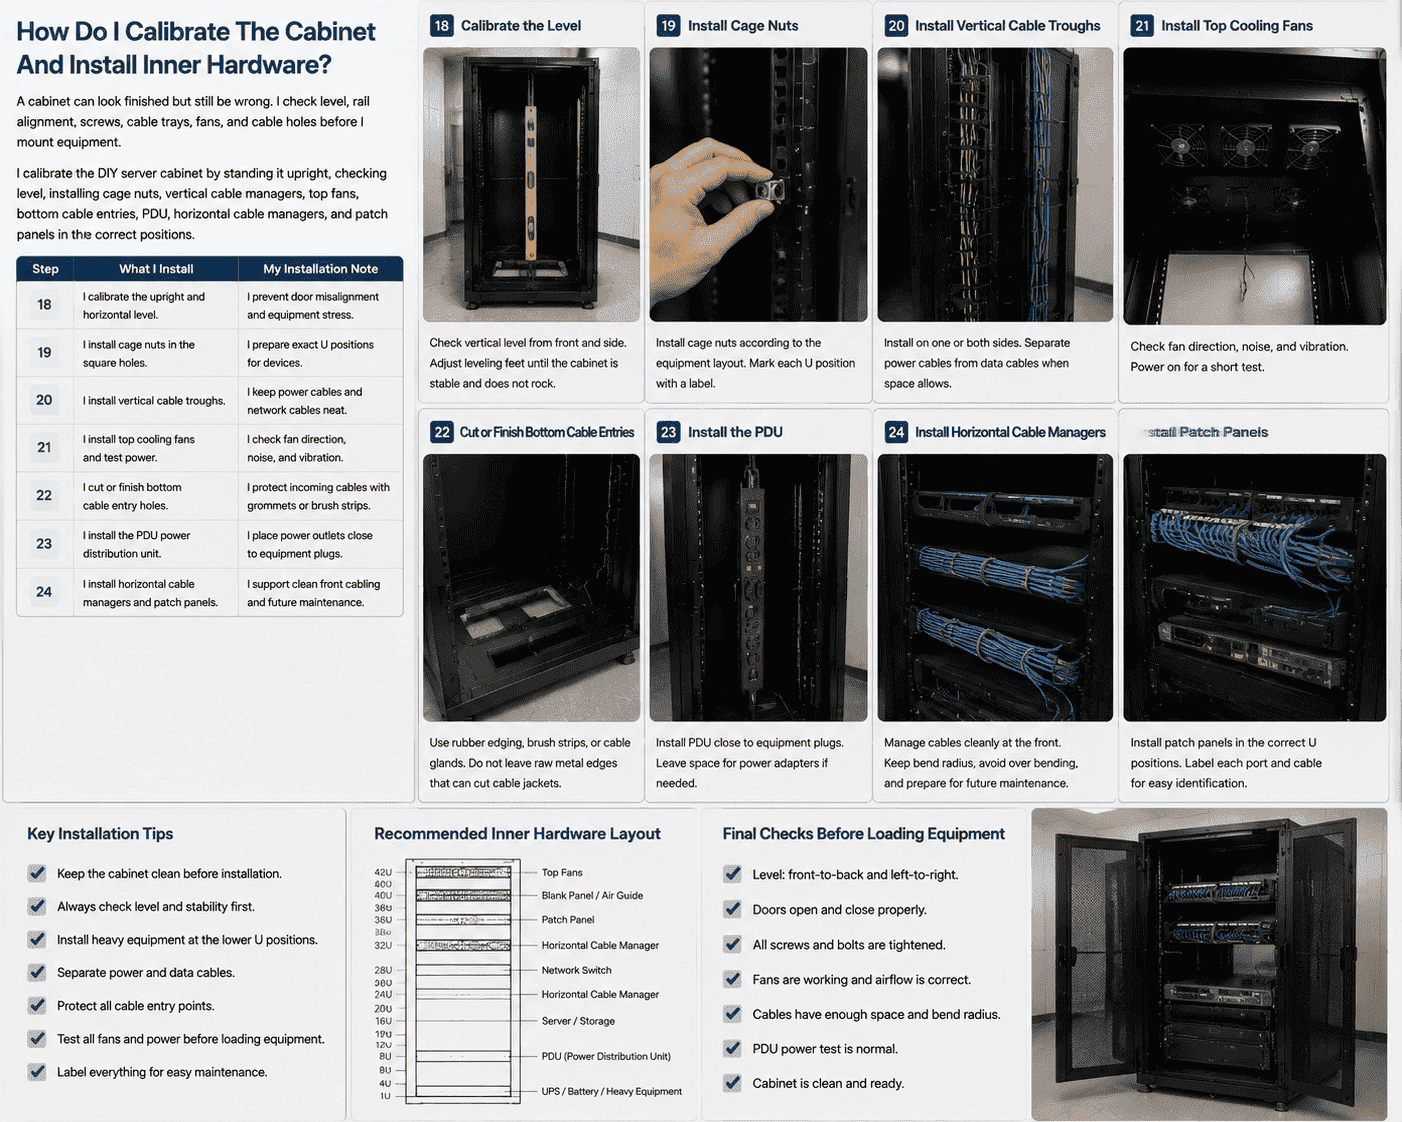
I move to inner hardware only after the cabinet body is clean and stable. I stand the cabinet upright on a flat floor. I check vertical level from the front and side. I also check if the cabinet rocks. If the floor is uneven, I adjust feet or add proper leveling pads. I do not mount servers in a cabinet that shakes.
| Step | What I Install | My Installation Note |
|---|---|---|
| 18 | I calibrate the upright and horizontal level. | I prevent door misalignment and equipment stress. |
| 19 | I install cage nuts in the square holes. | I prepare exact U positions for devices. |
| 20 | I install vertical cable troughs. | I keep power cables and network cables neat. |
| 21 | I install top cooling fans and test power. | I check fan direction, noise, and vibration. |
| 22 | I cut or finish bottom cable entry holes. | I protect incoming cables with grommets or brush strips. |
| 23 | I install the PDU power distribution unit. | I place power outlets close to equipment plugs. |
| 24 | I install horizontal cable managers and patch panels. | I support clean front cabling and future maintenance. |
I place cage nuts according to the equipment layout, not randomly. I mark each U position with a label. I usually keep heavy equipment lower in the cabinet. This improves stability.8 I install vertical cable troughs on one or both sides. I separate power cables from data cables when space allows.9 This makes troubleshooting easier and keeps the cabinet clean. For the bottom cable entry, I add rubber edging, brush strips, or cable glands. I do not leave a raw metal edge because it can cut cable jackets.10 I install the PDU where plugs can reach without tight bending. I also leave space for power adapters if the network equipment uses them. After I install the fans, I power them on for a short test. I listen for rubbing noise and check airflow with a piece of paper or smoke tester.
How Do I Mount Equipment And Manage All Cables?
Messy cabling creates heat, service delay, and wrong connections. I mount equipment by layers and label each cable before full operation.
I mount equipment by planning device layers, marking U positions, fixing core rack devices, connecting cables in order, using vertical and horizontal cable managers, and leaving airflow space around servers, switches, UPS, and patch panels.
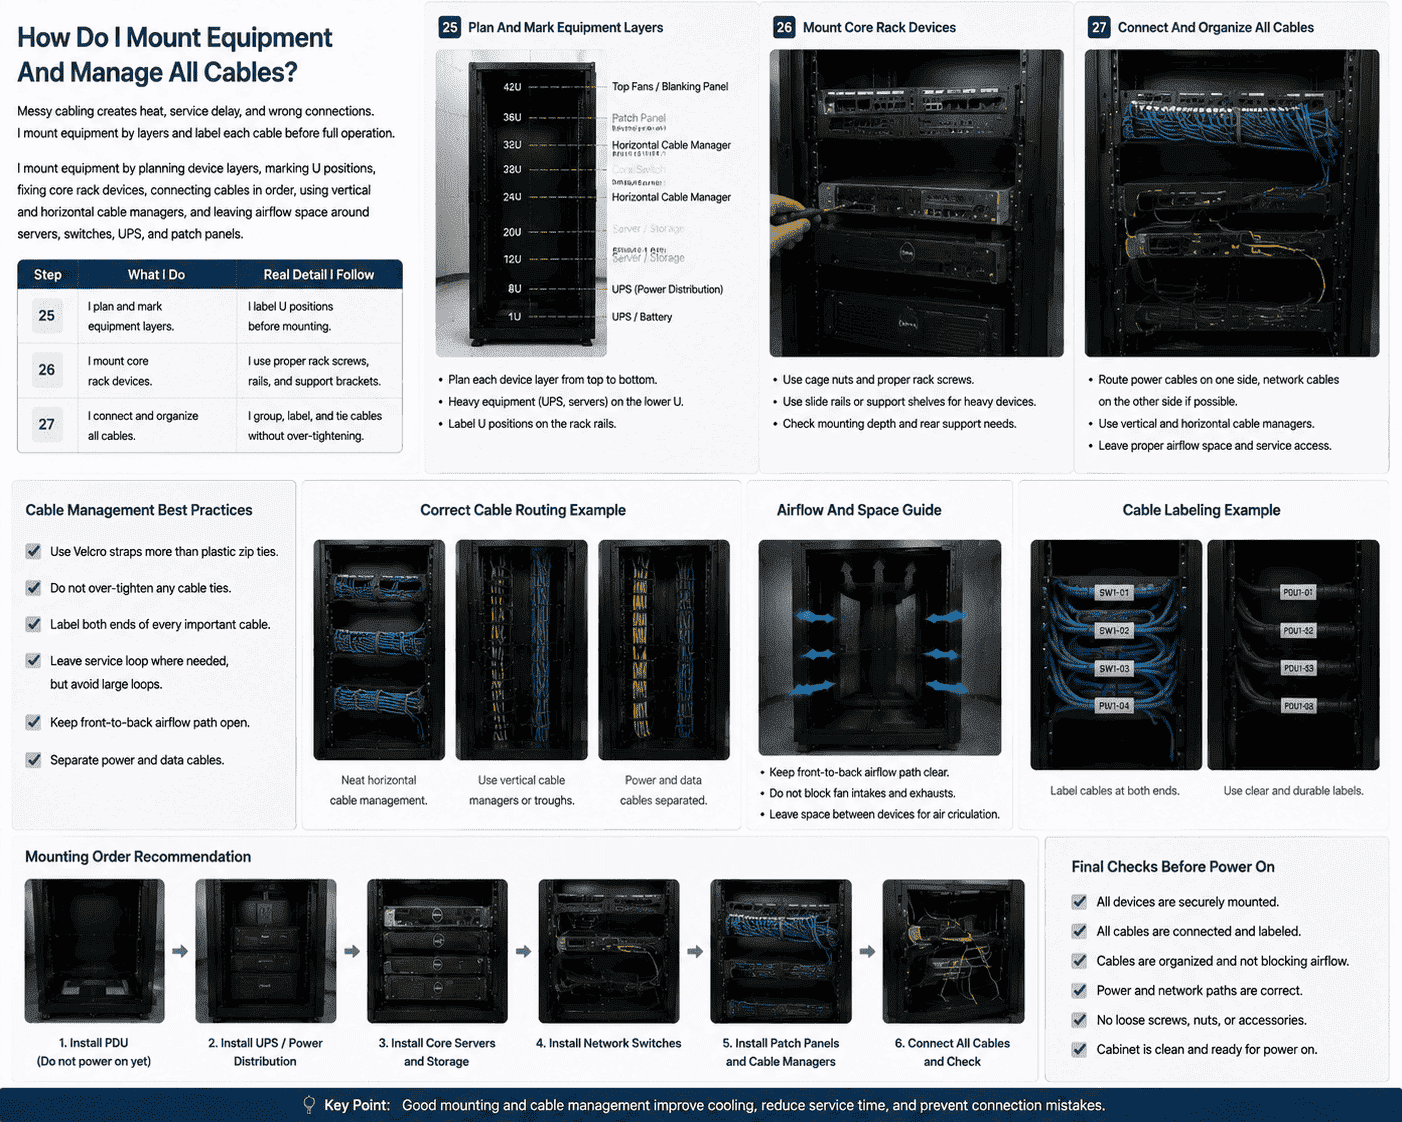
I never start equipment mounting by lifting the heaviest server first. I first make a layer plan. I put heavy equipment, like UPS units and deep servers, near the bottom. I place switches and patch panels where cable length and service access make sense. I avoid placing a hot server directly against a closed panel without airflow space. I also avoid crossing every cable in front of the cabinet. Good cable routing is not only about looking tidy. It affects cooling and service time.11
| Step | What I Do | Real Detail I Follow |
|---|---|---|
| 25 | I plan and mark equipment layers. | I label U positions before mounting. |
| 26 | I mount core rack devices. | I use proper rack screws, rails, and support brackets. |
| 27 | I connect and organize all cables. | I group, label, and tie cables without over-tightening. |
I use cage nuts and rack screws for standard rack equipment. For heavy servers, I use slide rails or support shelves. I do not rely only on two front screws for deep and heavy equipment. I check the equipment manual for mounting depth. Some servers need rear support. I connect the PDU first, but I do not power on everything at once. I route power cables on one side and network cables on the other side when the cabinet design allows it. I use Velcro straps more than plastic zip ties because Velcro can be opened and reused. If I use zip ties, I do not tighten them too much. A crushed cable can fail later. I label both ends of every important cable. I also leave a service loop where needed, but I do not leave large loops that block fans. I keep the front-to-back airflow path open.
How Do I Seal Dust Gaps And Run Safety Tests?
A cabinet is not complete when the last server is mounted. I still need dust control, power tests, airflow tests, load checks, and final corrections.
I finish a DIY server cabinet by sealing dust gaps, testing full power, checking fans, measuring stability under load, finding defects, correcting small issues, approving the cabinet, and making a simple maintenance plan.
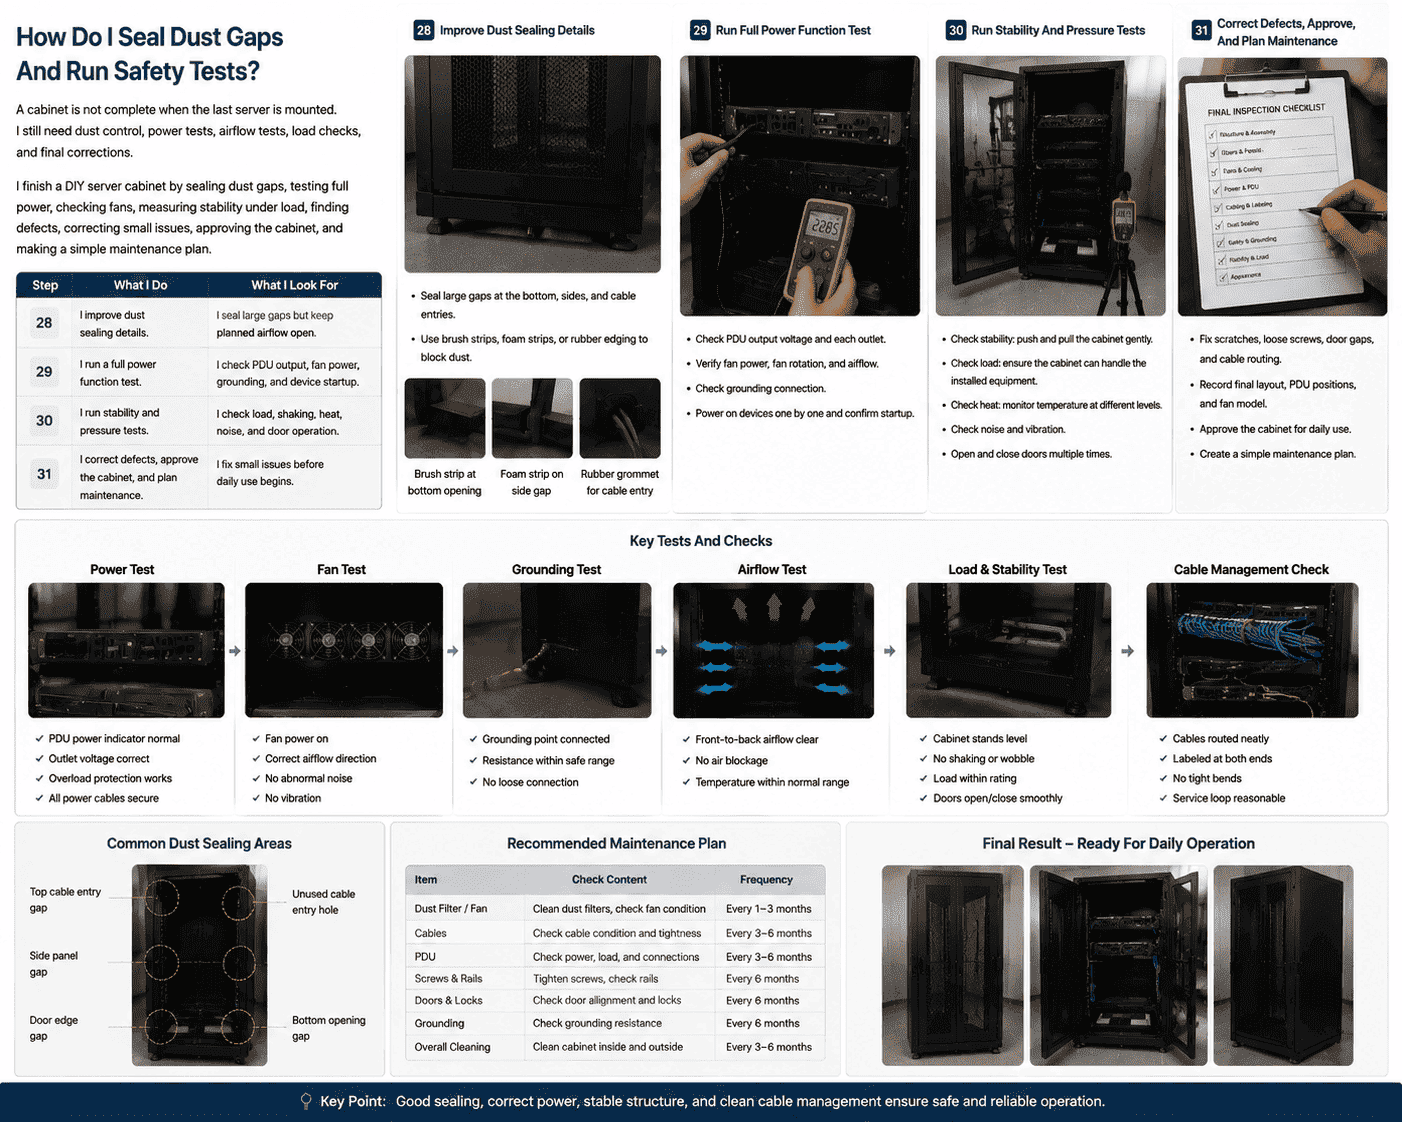
I always do final testing because a cabinet can hide small problems. A loose screw can create vibration. A sharp edge can damage a cable. A weak frame can shake when the door opens. A wrong fan direction can keep hot air inside the cabinet. I check these issues before I call the project finished.
| Step | What I Do | What I Look For |
|---|---|---|
| 28 | I improve dust sealing details. | I seal large gaps but keep planned airflow open. |
| 29 | I run a full power function test. | I check PDU output, fan power, grounding, and device startup. |
| 30 | I run stability and pressure tests. | I check load, shaking, heat, noise, and door operation. |
| 31 | I correct defects, approve the cabinet, and plan maintenance. | I fix small issues before daily use begins. |
I do not seal the cabinet like an airtight box. Servers need air. I seal only the wrong gaps, like unused bottom openings, side cracks, or large cable holes that bring in dust without helping airflow. I may use brush strips, foam strips, or rubber edging. Then I test power. I check that the PDU is firmly mounted. I check that cables do not touch fan blades. I check the grounding point if the cabinet has one. I power on fans first. Then I power on low-risk devices. Then I power on the main equipment. I watch temperature, noise, and vibration. I open and close the doors several times. I pull gently on cable groups to make sure they do not fall into fans. I also check if the cabinet can handle the installed weight. After testing, I correct scratches, loose screws, door gaps, labels, and cable routing. I record the final layout, PDU positions, and fan model. This record helps later maintenance.
Conclusion
I build a DIY server cabinet in 31 steps by planning first, fabricating accurately, managing heat and cables, then testing safety before daily use.
"Capacity Planning - Glossary - NIST CSRC", https://csrc.nist.gov/glossary/term/capacity_planning. The cited capacity-planning guidance supports reserving rack and infrastructure capacity for anticipated equipment growth. Evidence role: general_support; source type: institution. Supports: The source should support the general practice of reserving rack or infrastructure capacity for expected growth.. Scope note: The source may support spare capacity planning generally rather than validating a universal 20% reserve. ↩
"19-inch rack", https://en.wikipedia.org/wiki/19-inch_rack. The cited rack-standard reference defines the 19-inch rack form factor and its mounting interface for rack-mounted electronic equipment. Evidence role: definition; source type: institution. Supports: The source should define the 19-inch rack form factor and explain that it is a standardized mounting interface for rack-mounted electronic equipment.. Scope note: This supports the existence and standardization of the format, but it may not quantify the share of all network and server equipment using it. ↩
"[PDF] Thermal Guidelines and Temperature Measurements in Data Centers", https://datacenters.lbl.gov/sites/default/files/FINAL%20Thermal%20Guidelines%20and%20Temp%20Measurements%209-15-2020.pdf. The cited thermal-management source explains that rack-door openness and perforation affect airflow resistance and cooling performance in equipment cabinets. Evidence role: mechanism; source type: research. Supports: The source should explain how door openness or perforation affects airflow resistance and cooling performance in server racks.. Scope note: This supports the airflow mechanism; dust reduction from solid doors may depend on room filtration, leakage paths, and maintenance practices. ↩
"Powder Coating Thickness: Complete Guide [2026]", https://powdercoating.blog/en/powder-coating-thickness/. The cited coating reference documents that powder coating produces a measurable film thickness that can affect finished dimensions and tolerances. Evidence role: general_support; source type: institution. Supports: The source should provide typical powder-coating film thickness ranges or explain that coating thickness can affect dimensional fit.. ↩
"The woodworking myth of checking if the diagonals are equal length ...", https://www.reddit.com/r/woodworking/comments/ifs1qh/the_woodworking_myth_of_checking_if_the_diagonals/. The cited geometry or construction reference explains that matching diagonal measurements is a standard check for squareness in rectangular layouts. Evidence role: mechanism; source type: education. Supports: The source should explain that equal diagonal measurements are used to verify squareness in a rectangular frame when corresponding sides are fixed or intended to be equal.. Scope note: Equal diagonals are a practical squaring check for a constrained rectangular frame, but they are not by themselves a complete proof for every possible quadrilateral. ↩
"[PDF] Determination of the residual stresses near the ends of skip welds ...", https://nvlpubs.nist.gov/nistpubs/Legacy/IR/nistir5671.pdf. The cited welding-engineering source explains that welding heat input and sequence affect thermal contraction, residual stress, and distortion in fabricated metal structures. Evidence role: mechanism; source type: education. Supports: The source should explain how heat input, thermal contraction, and welding sequence influence distortion in welded structures.. ↩
"Move to a Hot Aisle/Cold Aisle Layout | ENERGY STAR", https://www.energystar.gov/products/data_center_equipment/16-more-ways-cut-energy-waste-data-center/move-hot-aislecold-aisle-layout. The cited data-center thermal guideline describes front-to-rear airflow as the common rack-equipment cooling arrangement underlying hot-aisle and cold-aisle layouts. Evidence role: expert_consensus; source type: institution. Supports: The source should support front-to-rear airflow as the common rack-server cooling pattern and explain its relationship to hot-aisle/cold-aisle cabinet design.. Scope note: This applies to typical rack-mounted IT equipment; some network appliances or specialty devices may use side-to-side or other airflow patterns. ↩
"1926.250 - General requirements for storage. - OSHA", http://www.osha.gov/laws-regs/regulations/standardnumber/1926/1926.250. The cited safety guidance supports placing heavier loads low in storage or equipment structures to lower the center of gravity and reduce tipping hazards. Evidence role: mechanism; source type: government. Supports: The source should support the safety principle that lower placement of heavy loads improves stability and reduces tipping risk.. Scope note: The source may address storage or workplace equipment generally rather than server cabinets specifically. ↩
"Cable Separation Standards | Winnie Industries", https://winnieindustries.com/resources/knowledge_center/guides_main/cable_separation/. The cited structured-cabling guidance supports separation between power and data cabling as a practice for limiting electromagnetic interference and improving cable organization. Evidence role: expert_consensus; source type: institution. Supports: The source should support the cabling practice of separating power and telecommunications/data cabling to reduce interference and aid cable management.. Scope note: Required separation distances vary by voltage, shielding, pathway type, and applicable local standards. ↩
"1926.405 - Wiring methods, components, and equipment for general ...", http://www.osha.gov/laws-regs/regulations/standardnumber/1926/1926.405. The cited electrical-safety guidance states that conductors should be protected from abrasion where they pass through openings or sharp-edged metal components. Evidence role: mechanism; source type: government. Supports: The source should support protecting conductors or cables from abrasion where they pass through metal openings or sharp-edged enclosures.. Scope note: The source may concern electrical wiring broadly, but the abrasion mechanism is directly relevant to cabinet cable entries. ↩
"How Researchers Are Driving Advances for Data Centers", https://eta.lbl.gov/news/how-researchers-are-driving-advances-data-centers. The cited data-center operations source supports that unmanaged cable congestion can obstruct airflow and that organized routing improves equipment access for maintenance. Evidence role: general_support; source type: research. Supports: The source should support that cable placement and congestion can obstruct airflow and that organized cabling improves access for maintenance or troubleshooting.. Scope note: Evidence for cooling effects is usually more direct than evidence for exact service-time reductions, which may vary by site procedures and technician experience. ↩
